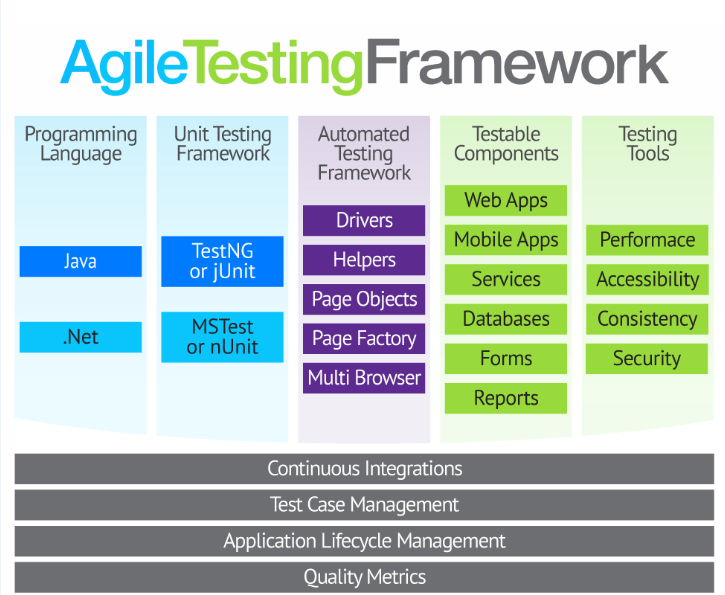
AGILE FOLLOWED @ AVC SERVICES

Agile Model and Methodologies: Guide for Developers and Testers.

What is Agile?

AGILE is a methodology that promotes continuous iteration of development and testing throughout the software development life cycle of the project. Both development and testing activities are concurrent unlike the Waterfall model

I hope we got an idea of Agile!!! Now, we can step on to Agile Testing.

The agile software development emphasizes on four core values.

  1. Individual and team interactions over processes and tools
  2. Working software over comprehensive documentation
  3. Customer collaboration over contract negotiation
  4. Responding to change over following a plan.

Agile versus Waterfall Method:

Agile and Waterfall model are two different methods for software development process. Though they are different in their approach, both methods are useful at times, depending on the requirement and the type of the project.

Agile Model Waterfall Model
  • Agile method proposes incremental and iterative approach to software design
  • Development of the software flows sequentially from start point to end point.
  • The agile process is broken into individual models that designers work on
  • The design process is not broken into an individual models
  • The customer has early and frequent opportunities to look at the product and make decision and changes to the project
  • The customer can only see the product at the end of the project
  • Agile model is considered unstructured compared to the waterfall model
  • Waterfall model are more secure because they are so plan oriented
  • Small projects can be implemented very quickly. For large projects, it is difficult to estimate the development time.
  • All sorts of project can be estimated and completed.
  • Error can be fixed in the middle of the project.
  • Only at the end, the whole product is tested. If the requirement error is found or any changes have to be made, the project has to start from the beginning
  • Development process is iterative, and the project is executed in short (2-4) weeks iterations. Planning is very less.
  • The development process is phased, and the phase is much bigger than iteration. Every phase ends with the detailed description of the next phase.
  • Documentation attends less priority than software development
  • Documentation is a top priority and can even use for training staff and upgrade the software with another team
  • Every iteration has its own testing phase. It allows implementing regression testing every time new functions or logic are released.
  • Only after the development phase, the testing phase is executed because separate parts are not fully functional.
  • In agile testing when an iteration end, shippable features of the product is delivered to the customer. New features are usable right after shipment. It is useful when you have good contact with customers.
  • All features developed are delivered at once after the long implementation phase.
  • Testers and developers work together
  • Testers work separately from developers
  • At the end of every sprint, user acceptance is performed
  • User acceptance is performed at the end of the project.
  • It requires close communication with developers and together analyse requirements and planning
  • Developer does not involve in requirement and planning process. Usually, time delays between tests and coding

Methodologies of Agile Testing:

There are various methods present in agile testing, and those are listed below:

Scrum

SCRUM is an agile development method which concentrates specifically on how to manage tasks within a team based development environment. Basically, Scrum is derived from activity that occurs during a rugby match. Scrum believes in empowering the development team and advocates working in small teams (say- 7 to 9 members). It consists of three roles, and their responsibilities are explained as follows:

  • Scrum Master
    • Master is responsible for setting up the team, sprint meeting and removes obstacles to progress
  • Product owner
    • The Product Owner creates product backlog, prioritizes the backlog and is responsible for the delivery of the functionality at each iteration
  • Scrum Team
    • Team manages its own work and organizes the work to complete the sprint or cycle

Product Backlog

This is a repository where requirements are tracked with details on the no of requirements to be completed for each release. It should be maintained and prioritized by product owner, and it should be distributed to the scrum team. Team can also request for a new requirement addition or modification or deletion

Scrum Practices

Practices are described in detailed:

Process flow of Scrum:

Process flow of scrum testing is as follows:

  • Each iteration of a scrum is known as Sprint
  • Product backlog is a list where all details are entered to get end product
  • During each Sprint, top items of Product backlog are selected and turned into Sprint backlog
  • Team works on the defined sprint backlog
  • Team checks for the daily work
  • At the end of the sprint, team delivers product functionality

eXtreme Programming (XP)

Extreme Programming technique is very helpful when there is constantly changing demands or requirements from the customers or when they are not sure about the functionality of the system. It advocates frequent “releases” of the product in short development cycles, which inherently improves the productivity of the system and also introduces a checkpoint where any customer requirements can be easily implemented. The XP develops software keeping customer in the target.

Business requirements are gathered in terms of stories. All those stories are stored in a place called the parking lot.

In this type of methodology, releases are based on the shorter cycles called Iterations with span of 14 days time period. Each iteration includes phases like coding, unit testing and system testing where at each phase some minor or major functionality will be built in the application.

Phases of eXtreme programming:

There are 6 phases available in Agile XP method, and those are explained as follows:

Planning

  • Identification of stakeholders and sponsors
  • Infrastructure Requirements
  • Security related information and gathering
  • Service Level Agreements and its conditions

Analysis

  • Capturing of Stories in Parking lot
  • Prioritize stories in Parking lot
  • Scrubbing of stories for estimation
  • Define Iteration SPAN(Time)
  • Resource planning for both Development and QA teams

Design

  • Break down of tasks
  • Test Scenario preparation for each task
  • Regression Automation Framework

Execution

  • Coding
  • Unit Testing
  • Execution of Manual test scenarios
  • Defect Report generation
  • Conversion of Manual to Automation regression test cases
  • Mid Iteration review
  • End of Iteration review

Wrapping

  • Small Releases
  • Regression Testing
  • Demos and reviews
  • Develop new stories based on the need
  • Process Improvements based on end of iteration review comments

Closure

  • Pilot Launch
  • Training
  • Production Launch
  • SLA Guarantee assurance
  • Review SOA strategy
  • Production Support

There are two storyboards available to track the work on a daily basis, and those are listed below for reference.

  • Story Cardboard
    • This is a traditional way of collecting all the stories in a board in the form of stick notes to track daily XP activities. As this manual activity involves more effort and time, it is better to switch to an online form.


  • Online Storyboard
    • Online tool Storyboard can be used to store the stories. Several teams can use it for different purposes.

Crystal Methodologies

Crystal Methodology is based on three concepts

  1. Chartering: Various activities involved in this phase are creating a development team, performing a preliminary feasibility analysis, developing an initial plan and fine-tuning the development methodology
  2. Cyclic delivery: The main development phase consists of two or more delivery cycles, during which the
    1. Team updates and refines the release plan
    2. Implements a subset of the requirements through one or more program test integrate iterations
    3. Integrated product is delivered to real users
    4. Review of the project plan and adopted development methodology
  3. Wrap Up: The activities performed in this phase are deployment into the user environment, post- deployment reviews and reflections are performed.

Dynamic Software Development Method (DSDM)

DSDM is a Rapid Application Development (RAD) approach to software development and provides an agile project delivery framework. The important aspect of DSDM is that the users are required to be involved actively, and the teams are given the power to make decisions. Frequent delivery of product becomes the active focus with DSDM. The techniques used in DSDM are

  1. Time Boxing
  2. MoSCoW Rules
  3. Prototyping

The DSDM project consists of 7 phases

  1. Pre-project
  2. Feasibility Study
  3. Business Study
  4. Functional Model Iteration
  5. Design and build Iteration
  6. Implementation
  7. Post-project

Feature Driven Development (FDD)

This method is focused around “designing & building” features. Unlike other agile methods, FDD describes very specific and short phases of work that has to be accomplished separately per feature. It includes domain walkthrough, design inspection, promote to build, code inspection and design. FDD develops product keeping following things in the target

  1. Domain object Modeling
  2. Development by feature
  3. Component/ Class Ownership
  4. Feature Teams
  5. Inspections
  6. Configuration Management
  7. Regular Builds
  8. Visibility of progress and results

Lean Software Development

Lean software development method is based on the principle “Just in time production”. It aims at increasing speed of software development and decreasing cost. Lean development can be summarized in seven steps.

  1. Eliminating Waste
  2. Amplifying learning
  3. Defer commitment (deciding as late as possible)
  4. Early delivery
  5. Empowering the team
  6. Building Integrity
  7. Optimize the whole

Kanban

Kanban originally emerged from Japanese word that means, a card containing all the information needed> to be done on the product at each stage along its path to completion. This framework or method is quite adopted in software testing method especially in agile testing.

Difference between Scrum and Kanban

Scrum Kanban
  • In scrum technique, test must be broken down so that they can be completed within one sprint
  • No particular item size is prescribed
  • Prescribes a prioritized product backlog
  • Prioritization is optional
  • Scrum team commits to a particular amount of work for the iteration
  • Commitment is optional
  • Burndown chart is prescribed
  • No particular item size is prescribed
  • Between each sprint, a scrum board is reset
  • A Kanban board is persistent. It limits the number of items in workflow state
  • It cannot add items to ongoing iteration
  • It can add items whenever capacity is available
  • WIP limited indirectly
  • WIP limited directly
  • Timeboxed iterations prescribed
  • Timeboxed iterations optional

Agile metrics:

Metrics that can be collected for effective usage of Agile is:

  • Drag Factor
    • Effort in hours which do not contribute to sprint goal
    • Drag factor can be improved by reducing number of shared resources, reducing the amount of non-contributing work
    • New estimates can be increased by percentage of drag factor -New estimate = (Old estimate+drag factor)
  • Velocity
    • Amount of backlog converted to shippable functionality of sprint
  • No of Unit Tests added
  • Time taken to complete daily build
  • Bugs detected in an iteration or in previous iterations
  • Production defect leakage.

Thanks,

AVISHCARS SERVICES

PAPER BAGS @ AVC PRODUCTS

A paper bag is a bag made out of paper. Paper bags are commonly used as shopping bags.

Here are some of the ways we reuse paper bags. Share your ideas with us, too!

1. Collect paper recycling in it, and recycle the whole package
2. Use it as gift wrap
3. Make gift tags
4. Ready a spot of land for a garden by cutting the bags, flattening them, and covering them with compost (it kills weeds and prevents them from hindering your garden)
5. Collect kitchen scraps and other compost items; when it’s time to compost, dump out the food scraps and then tear up the bag to go directly into the compost pile as well
6. Shred and add to the compost
7. Shred and use for packages to keep breakable items safe
8. Fold the bags and take them to the store next time
9. If the bag has handles, continue to reuse as a tote
10. Cover textbooks with them (a personal favorite back in junior high; cover it with the blank side out and proceed to write quotes from “Empire Records” all over it)
11. Line the trash can with it–but instead of tossing it on the first use, simply toss the trash in the dumpster and continue to reuse the paper bag as a liner
12. Get crafty and use the blank side for art projects; brown paper is great for painting, markering, and more
13. Cut the bags so they lay flat and use as a tablecloth while carving pumpkins; leave the scraps where they are and compost the whole she-bang when you’re done.

Thanks,

AVISHCARS PRODUCTS

HUBLI

Mobile App Development Steps followed @ AVC

AVC 12-Step Guide to Building Your Very First Mobile App.

Did you wake up this morning with a creative idea for the perfect mobile app? One that nobody else has thought of before, and that you are certain will be very popular?

The only problem is, you don’t know how to even begin designing and building an app! Never fear — read this brief guide on the AVC 12 key steps to bring your mobile app idea from your imagination to smartphone screens everywhere.

Step 1: Define Your Goal

Having a great idea is the starting point into every new project. Before you go straight into detailing though, you must clearly define the purpose and mission of your mobile app. What is it going to do? What is its core appeal? What concrete problem is it going to solve, or what part of life is it going to make better?

Defining a clear goal for the app is also going to help you get there faster.

mobile app goal diagram


Step 2: Start Sketching

By developing sketches you are laying the foundation for your future interface. In this step you visually conceptualize the main features and the approximate layout and structure of your application.

Having a first rough sketch of your app helps everyone on your team understand the mission. These sketches should be used as reference for the next phase of the project.

Step 3: Research

This research has four main purposes:

  1. Find out whether there are other apps doing the same thing
  2. Find design inspiration for your app
  3. Find information on the technical requirements for your app
  4. Find out how you can market and monetize your app

While you may think that you have a revolutionary idea, you may get your hopes crushed very quickly. There are more than 1 million apps for Android and iOS, so building something that hasn’t been done before is nearly impossible. Nonetheless you must not get discouraged by those who may playing in the same arena. It is imperative that you focus on your own project and your user acquisition. Learn from the key features and mistakes of your competitors, and drop all other thoughts about them.

There is a great marketplace for designers called Dribbble. Designers use Dribbble to showcase their work to others for feedback and to get inspiration from fellow artists. It is probably my favorite place to look for ideas about design and implementation.

Dribbble screenshot

This is also the right time to look into the technical aspects of your mobile app. Find out what your requirements are and get a clear picture of whether your idea is truly feasible or not from a technical standpoint. In most cases there will be an alternative solution to proceed on a slightly different route. This research extends into legal restrictions like copyright and privacy questions, giving you a complete understanding of your situation.

If you have connections in the industry, get an expert opinion on your idea right from the start.

Two other important points are marketing and monetization. Now that you have confirmed the feasibility of your app, you should think about your strategy of getting it out onto the market. Determine your niche — know exactly how you can reach your target user and how you need to approach him to make him see the value and use the app.

Another important consideration is figuring out how your app is going to generate money. Will you charge your user to download it? Or will you offer the app for free but run ads on it? This model would require a large user base, so think about that as well.

There are various ways to monetize an app and it is up to you to decide on the channel you want to use.

Step 4: Create a Wireframe and Storyboard

In this phase your ideas and features fuse into a clearer picture. Wireframing is the process of creating a mockup or prototype of your app. You can find a number of prototyping tools online. The most popular ones are Balsamiq, Moqups, and HotGloo, which allows you to not only drag and drop all your placeholders and representative graphics into place, but also add button functionality so that you can click through your app in review mode.

While you are working on your wireframes you should also create a storyboard for your app. The idea is to build a roadmap that will help you understand the connection between each screen and how the user can navigate through your app.

mobile app storyboard diagram

Step 5: Define the Back End of Your Mobile App

Your wireframes and storyboard now become the foundation of your back-end structure. Draw a sketch of your servers, APIs, and data diagrams. This will be a helpful reference for the developer, and as more people join the project you will have a (mostly) self-explanatory diagram for them to study.

Modify your wireframes and storyboard according to technical limitations, if there are any.

Step 6: Test Your Prototype

Revert to your wireframes and ask friends, family, colleagues, and experts to help you review your prototype. Grant them access to the wireframe and have them give your app a test run. Ask them for their honest feedback and to identify flaws and dead-end links. If possible, invite them to your studio and have them try out the prototype in front of you. Monitor how they use the app, taking note of their actions and adapting your UI/UX to them.

The goal is to concretize your app concept before it goes into the design process! Once you start designing it is much harder to change things around, so the clearer the prototype from the start, the better.

Micro-Teaching Reporting Tool (e@MTRT)

Micro-teaching is one of the most recent innovations in teacher education or training programme which aims at modifying teacher’s behavior according to the specific objectives. It is a process of subjecting samples of human behavior to 5 R’s of video tape- ‘recording’, ‘reviewing’, ‘responding’, ‘refining’, and ‘redoing’. Micro-teaching is a controlled practice that makes it possible to concentrate on teaching behavior in the student-teacher training programme.

Features of Micro-teaching

  1. Micro-teaching is relatively a new innovation in the field of teacher education.
  2. Real teaching: Micro-teaching is real teaching but focuses on developing teaching skills.
  3. Scaled down teaching: Micro-teaching is a scaled down teaching:

(i)                To reduce the class size to 5-10 pupils.

(ii)              To reduce the duration of period to 5-10 minutes.

(iii)            To reduce the size of the lesson.

(iv)            To reduce the teaching skill.

  1. Individualised device: Micro-teaching is a highly individualized training device.
  2. Providing feed back: It provides the adequate feedback for trainee’s performance.
  3. Device for preparing teachers: Micro-teaching ia a device to prepare effective teachers.
  4. Selection of one skill: It provides opportunity to select one skill at a time and practice it through scaled down encounter and then take others in a similar way.
  5. Use of videotape and closed circuit television makes observation very effective.
  6. Micro-teaching is an analytic approach to training.


Phases of Micro-teaching:

Micro-teaching procedure has three phases:

(i)                Knowledge acquisition phase

(ii)              Skill acquisition phase

(iii)            Transfer phase


AVISHCARS SERVICES Came up with the plan of developing a reporting tool on Micro teaching and making the tool easily available to all teaching / educational systems.

Features of MTR tool:

  1. Reduces the Manual Work.
  2. All under one roof i.e. Roof Of Technology.
  3. Save maximum time.
  4. Go Green – Save Papers.
  5. More accuracy on teaching skills.
  6. Time Managment.
  7. Identify minute mistakes. …


Do you want to automize your school / college / educations?

– If YES, Then Contact AVISHCARS SERVICES.

Thanks & Regards,

Team AVC Services.


AVISHCARS PRODUCTS – PAPER NAPKIN

A napkin, serviette or face towelette is a rectangle of cloth used at the table for wiping the mouth and fingers while eating. It is usually small and folded, sometimes in intricate designs and shapes. The word comes from Middle English, borrowing the French nappe—a cloth covering for a table—and adding -kin, the diminutive suffix.

Conventionally, the napkin is often folded and placed to the left of the place setting, outside the outermost fork. In a restaurant setting or a caterer’s hall, it may be folded into more elaborate shapes and displayed on the empty plate. Avishcars techniques can be used to create a three-dimensional design. A napkin may also be held together in a bundle with cutlery by a napkin ring. Alternatively, paper napkins may be contained with a napkin holder.

Napkins were used in ancient Roman times. One of the earliest references to table napkins in English dates to 1384–85.

Summaries of napkin history often say that the ancient Greeks used bread to wipe their hands. This is suggested by a passage in one ofAlciphron’s letters , and some remarks by the sausage seller in Aristophanes’ play, The Knights.The bread in both texts is referred to as apomagdalia, which simply means bread from inside the crust known as the crumb, and not special “napkin bread”. The use of paper napkins is documented in ancient China, where paper was invented in the 2nd century BC. Paper napkins were known as chih pha, folded in squares, and used for the serving of tea. Textual evidence of paper napkins appears in a description of the possessions of the Yu family, from the city of Hangzhou.

@ AVISHCARS we do produce MULTI SIZE NAPKINS (HARD & SOFT)  FROM 20 – 30 ” with single embosing unit and dying unit.

AVISHCARS BUSINESS COVERAGE LOCATIONS (KARNATAKA):

  1. HUBLI.
  2. GADAG.
  3. KOPPAL.
  4. HOSPET.
  5. DHARWAD.
  6. RAICHUR.
  7. GULBARGA.
  8. BAGALKOT.
  9. BIJAPUR.
  10. GANGAVATI.
  11. BELLARY.

WILL BE UNDER AVISHCARS COVERAGE (KARNATAKA):

  1. BELGAUM.
  2. DAVANGERE.
  3. HAVERI.
  4. HARIHAR.
  5. RANEBENNUR.
  6. TUMKUR.
  7. BANGALORE.
  8. SIRSI.
  9. KARWAR.
  10. MANGALORE.
  11. UDUPI.
  12. MANIPAL.

OUT-SIDE KARNATAKA:

  1. GOA.
  2. MUMBAI.
  3. PUNE.
  4. KOLLAPUR.

RULES FOLLOWED @AVISHCARS:

  1. FOR AVISHCARS QUALITY IS MORE IMPORTANT  THAN QUANTITY.
  2. WE DO NOT COMPROMISE WITH THE PRODUCT STANDARDS AS REQUIRED BY OUR CLIENTS.
  3. COMMITMENT – DELIVERED ON PROMISED DATES.
  4. FOR ANY TYPE OF PROBLEMS / ISSUES, AVISHCARS HAVE SOLUTIONS.
  5. TEAM WORK.

CONTACT:

AVISHCARS PRODUCTS

GOKUL INDUSTRIAL AREA

HUBLI

avishcarservices@gmail.com